

Introduction to Music Technology Curriculum/Project List
Preface
I have accepted a new job for the 20-21 school year, so I’ve migrated my Music Technology projects from OneNote to my website. They are extremely open ended in nature, allowing students with a variety of past experiences to bring them into the music they create in this course. If you have questions with any of these projects, please contact me. I’ve enjoyed teaching this course, and I hope I can help others teach it as well!
If this is useful to you, I encourage you to check notes from my Midwest presentation. Many of the concepts regarding curriculum, pacing, rubrics, and more are discussed there.
Fall – P1: Repetition
The goal is to make your song thinking specifically about repetition.
As listeners of music, we want a balance of repetition and variation. Overly repetitive music is boring, and music that never repeats itself it not catchy to most listeners. Most popular songs today have a healthy mix of both of these.
Requirements:
For a 90…
- One song, at least 1min 30sec
- Seven tracks in total, at least one should be a software instrument (green track)
- There should be a change in the music every four bars (measures)
- Every software instrument track must be quantized
- Posted on your Weebly
Final 10…
- Does your project fit well together musically? “Does it sound good?”
Fall – P2: Portfolio Creation
The goal of keep a portfolio is…
- Seeing for yourself how much you improve over this year
- Share with others what you make in Music Tech
Great portfolios from past years:
Requirements
- Homepage with a little introduction about yourself
- Two other pages: Semester 1 and Semester 2
Fall – P3: Fast and Slow
NB: Before teaching this, be sure to teaching quantizing and demonstrate different BPMs. Consider teaching automation of tempi to interested students too.
The goal is to make your song thinking specifically about tempo (speed of music). We’ll be working generally: fast and slow.
As listeners of music, we want a balance of tempo. A lot of music falls into the same speeds so we can dance to it, but we use this time to explore a variety of tempi.
Requirements:
For a 90…
- One song, at least 1min 30sec – at least two tempos used. OR Two songs, 45 seconds each at different tempos.
- Seven tracks in total, at least one should be a software instrument (green track)
- There should be a change in the music every four bars (measures)
- Every software instrument track must be quantized
- Posted on your Weebly
Final 10…
- Does your project fit well together musically? “Does it sound good?” Does it make use of a wide variety of tempos well?
Fall – P4: Percussion Beat
NB: Consider doing a day in the band room showing off real world percussion instruments. Also, demonstrate all requisite skills below before turning students loose!
Mr. Ehrlich’s Demos Today:
- Beat Map Video
- Adding a region
- Recording specific drum instruments
- Recording on loop
- Using one track versus different tracks
- Using the pencil
- Checking specific notes on the keyboard, changing octaves
- Quantize brief demo
- MIDI Drum Map
Building a Trap Beat:
- A great example using Reason!
- Mr Ehrlich’s recreation using Logic.
- Here is another example using Garageband.
Requirements:
For a 90…
- At least ten tracks
- 45 seconds at a minimum (if it’s longer than 1:15, make sure it’s varied enough!)
- There must be a change every four bars
- No loops or automatic drummer allowed (only green software instruments)
- Use any instruments in the following categories
- Drum Kit
- Electronic Drum Kit
- Mallet
- Orchestral → Percussion
- World → Percussion
- Remember there are two families of percussion instruments: pitched and unpitched. Use both!
- Be sure that your project uses the basics of layering to be interesting!
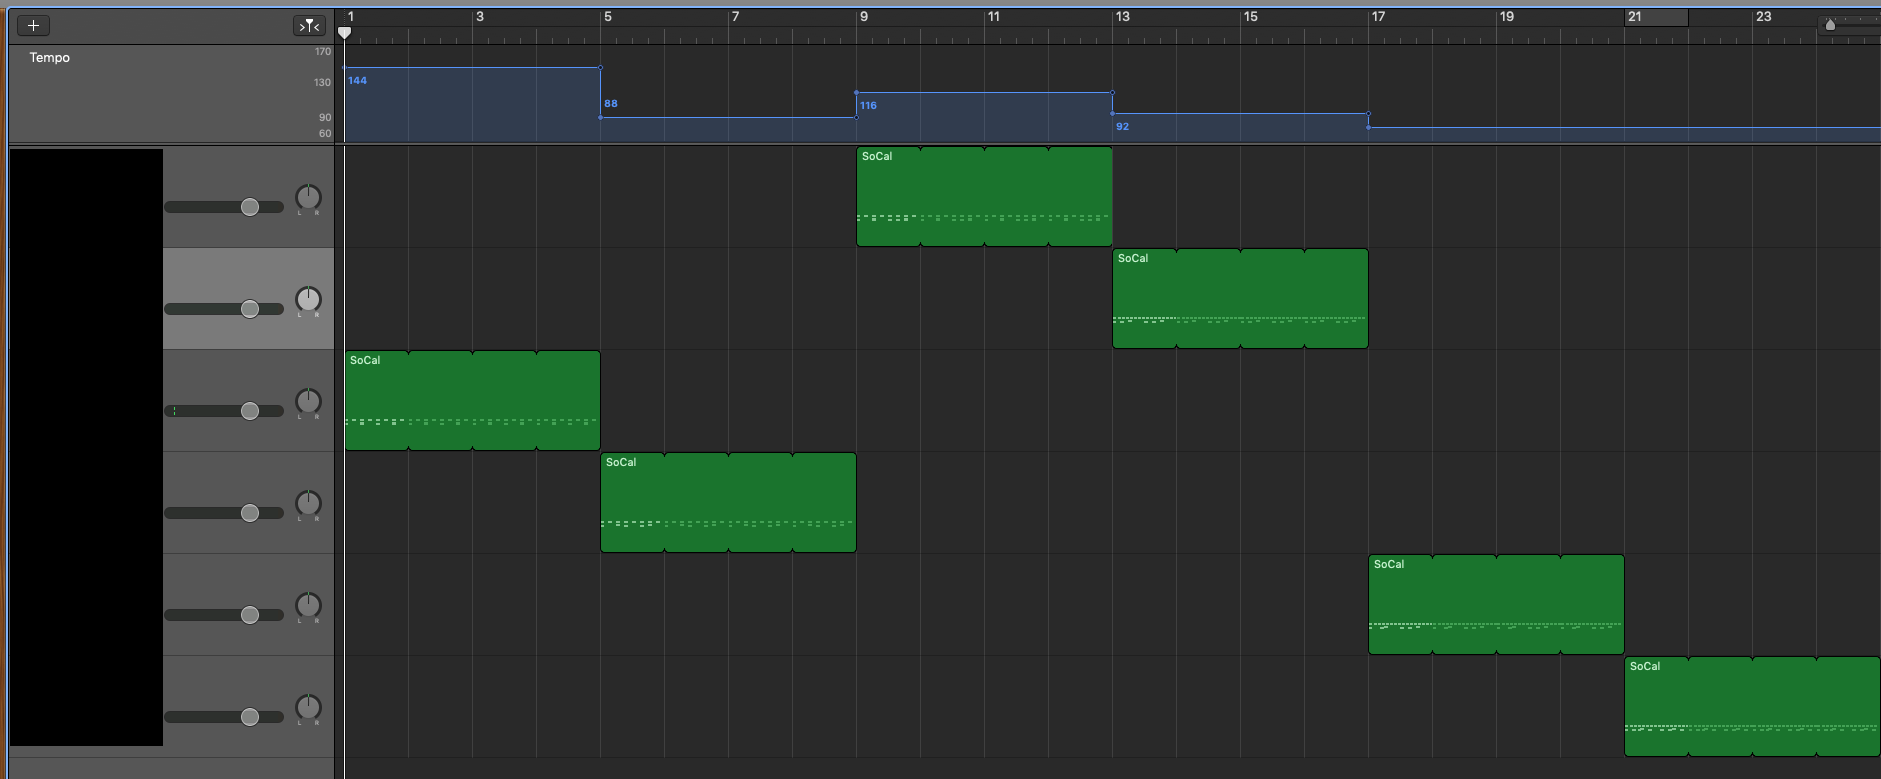
Fall – P5: Build Six Drum Beats
- Recreate these six rhythm tracks in GarageBand.
- Audio file and PDFs
- Create all six tracks in one project.
- Use the tempo track to change the tempo.
- Each beat has a specified tempo to use (you can record in at a much slower tempo if you’d like.)
- Choose an instrument that is appropriate for each track.
- If you have questions, raise your hand and ask. I am happy to help.
- Each beat should be four measures long.
- Audio file and PDFs
Your project should look like the below screenshot.
Fall – P6: Five Note Groove
In the Ableton Learning Music series, we learned about a five note scale that sounds pretty good together, the minor pentatonic scale.
The notes we’ll use are: A, C, D, E and G.
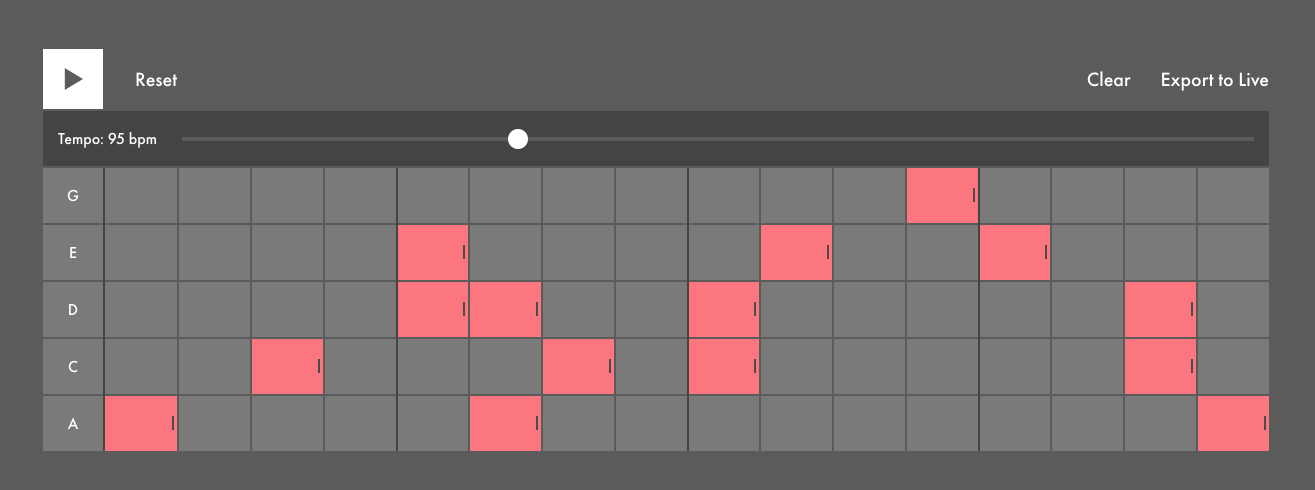
Here is the loop tool that will allow you to explore this combination of pitches.
Suggested order of your project:
- First: Create your rhythm tracks/beat (use software instruments (green tracks!))
- Second: Create your bass line. Think about using an instrument in the arpeggiator family.
- Third: Add a melody (something you could put words to)
- Fourth: Add other embellishments/effects/etc.
Requirements:
For a 90…
- Should have at least six different tracks
- Must have a musical change every four measures
- Only two loops are allowed (less than ten seconds each) – use green software instruments!
- Your project should be at least a minute long
Final ten points:
- Does your music use this five note pentatonic scale in an inventive way?
- Does your project “sound good” to the musical ear?
Fall – P7: Dorian Groove
Terms to Know
- Melody: What is sung. Generally the notes that the lyrics go to, or an instrumental break.
- Chords: Three or more notes at the same time.
- Chord Progression: A series of chords that are used on repeat, almost always in the same order
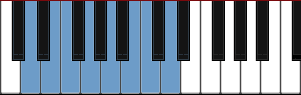
- Dorian: A specific scale or mode. The D Dorian scale consists of all white key.
- Bass Line: A series of notes that outline chords. The bass line must fit in with the chord progression in order for the track to “sound good.”
- Stems: Separate tracks from a specific song, good for remixing.
The D dorian scale is all white keys, starting at the white key between the group of two black keys. (The note D.) Here is the scale typed up:
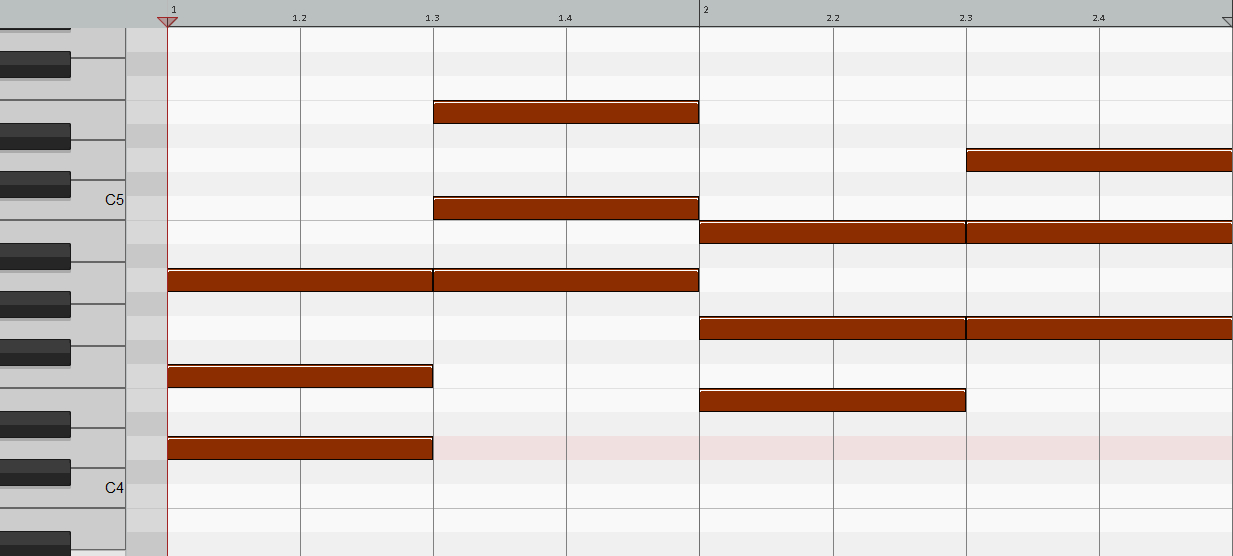
Here is a basic chord progression you can use. Use the grid on the left to determine which notes for each chord. You can rearrange and modify any way you’d like, but the order should probably remain the same.
Requirements:
For a 90…
- Types of Tracks
- Rhythm/Percussion/A Beat
- Bass Line (using a bass). Use the dorian scale.
- Write a chord progression using the above chords (Dm → Am → Em → Gmaj)
- Some sort of melody using the dorian scale.
- 8 Tracks in Total
- Project should be at least 45 seconds (no limit, but should be interesting to listen to)
- A change every eight measures
- Intelligent start and stop (no random abrupt endings)
- Two loops are allowed, but not for your entire rhythm/percussion beat (less than 10 seconds permitted)
- Your project will sound best if the melodic tracks (not the percussion/rhythm) use all white keys. However, black keys can add some more interest if used well.
Fall – P8: Scary Story
NB: I typically had the students also do a podcast. Here is an awesome example from a former student entitled, “Harry Potcast”
- In honor of a belated Halloween, you’ll record a scary story and create a soundtrack based on that story. (If you’d like to use a different story, that’s fine, but it has to be something you can make music and sound effects to! Maybe Christmas related, or your own short story?)
- Process:
- Choose a story:
- Here is a good place to start looking at Halloween stories
- Your goal story should be no longer than a minute, or this project will take too long.
- Time your story with you reading it in your head. If you need to make it longer or shorter, you can, but it should still make sense to the listener.
- At the end of this week, you will record in the Learning Commons Recording Studio. I’ll assign fifteen minute time slots per student.
- Create a soundtrack based on the story. (A serene moment should means serene music. A scary moment should mean scary music.)
- Example sites:
- Feel free to Google your own sound effects and download as needed.
- The track should be at least 75% of your own green MIDI tracks.
- Be sure the soundtrack matches the story.
- Choose a story:
- Demo of Soundtrack:
- Repetition of minor third
- Dorian scale
- Descending bass line
- pizzicato
- dissonant piano chords
- Example Video
Elements of Tension and Relaxation in Music
Musical Elements that produce tension
- Repetition – of almost anything
- Jagged Articulations
- Dramatic Devices (Loud and then immediately soft)
- Increased Volume
- Wide Intervals (space between notes) – especially ascending
- Dissonant Harmony (note clusters)
- Ascending Lines
- Extreme Register of Instruments
- Alternating Directions
Musical Elements that produce relaxation
- Decreased volume
- Notes of longer duration
- Smoothness in articulation
- Silence
- Descending lines
- Rest or Space
Fall – P9: Final Project
Take a holiday tune (Deck the Halls, O Come All Ye Faithful, Sleigh Ride, Carol of the Bells, etc.) and re-envision it. Use the skills that you’ve learned (working with MIDI, adding drums/loops, form) to create something new. The Process:
You will use a MIDI file of a pre-existing holiday tune, and transform it to something new and original. Change the form, instrumentation, add drums, add automation, change the layering, edit sections, etc. Consider combining two different holiday tunes together. Here is the link to download the MIDI files.
Write your own percussion (green tracks required.) Loop it as needed, but you’ll earn more points for a music interesting drum part that fits with the music.
Be sure to use the following techniques: layering, slice and dice, automation.
- Layering: combine multiple instruments on the same track
- Slice and Dice: separate the melodies between multiple
- Automation: changing volume and other parameters during the song
- Level 2 Students: EQ each track once you’re done, including the Master.
Spring – P1: First Steps in Logic
Welcome back from break! Some goals for Week 1.
- Think About…
- What do you do want to do this semester? Write/record a song? Remix song(s) together using their STEM files? Film soundtrack? Sampling? More recording in some capacity.
- I want you to get out of this class what you want! If there is something you want to do, talk to me about it. Let’s make it happen.
- Projects we’ll do this semester are more open ended and will take more time. Of course I’ll be there to help you every step of the way.
- Getting Started in Logic
- Drag Logic into the Dock
- Test MIDI Controllers
- Get into Logic, turn on Advanced tools, and start a loops based project
- Start learning differences between Logic and GB
- Answer questions from some Logic tutorials
- Install any missing sounds/instruments
- We may have a few skill proficiencies, where I ask you to demo skills on Logic covered from me or from YT tutorials. The goal is to get you up to speed asap.
- Review saving and exporting
P1: First Steps in Logic
Requirements:
For a 90…
- At least seven tracks
- Should be at least 1:30
- Must be in either ABA, ABACA, or a different form
- At least one of your tracks must been a green software instrument (drums is easiest)
- Automation must be present on at least one track
- Use of some sort of EQing/Mastering must be present
- There should be a change every four measures.
- Output should not be in the red, levels should be set reasonably.
Final 10 points:
- Is your track interesting to listen to?
- Does it use other cool techniques in Logic?
- Teach me something in Logic I don’t know!
Spring – P2: Logic Tutorial 1
-
Open the loop library.
-
What are the three main types of loops? Green: Blue: Yellow:
-
Bring in a loop you like into the workspace.
-
What’s the shortcut for: Play/stop Go to beginning Forward/reverse Record Cycle Mode
-
What’s the shortcut to set the cycle play to a specific clip?
-
Be able to zoom in and zoom out using the tools on the top right.
-
How do you make all the tracks the same size?
-
Do some exploration of the Snap tools.
-
What are the commands on the track itself?
-
What is the window that appears to the left of the workspace, and what is the shortcut to open it? What does it show?
-
What’s the shortcut to revert faders to the original value?
-
What is the shortcut to create a new track?
-
Bring in the drummer and explore it.
-
(14:30ish) What’s the difference between “empty channel strip” and “default patch”?
-
What does “No In” “No Out” refer to?
-
What’s the shortcut to hide/show the library?
-
What does the “R” button do?
-
Why does he start on bar 2?
-
What is the shortcut to turn on/off the metronome?
-
What’s the shortcut to open the piano roll?
-
What is the advantage of repeating versus looping a MIDI region?
-
What does Command L convert?
-
What does Command R do?
-
What is exporting a single audio filed called?
-
When exporting an audio file, who do you need to set the cycle play?
Spring – P3: Logic Tutorial 2
-
1:45 Why does it make sense to use markers?
-
2:03 How do you show/hide global tracks?
-
2:15 How do you add markers?
-
3:15 How do you add colors to markers?
-
4:25 How do you join clips together? Why is it worth doing?
-
5:30 How do you convert drummer tracks to MIDI regions? Why is it worth doing?
-
6:17 What are the three ways to open the piano roll editor?
-
7:20 Explore the tools available on the click dropdowns in the editor.
-
7:55 What are the zoom controls using the keyboard?
-
10:05 What’s a snare flam?
-
10:55 How does he make specific notes louder on the drum kit?
-
12:10 What is a shortcut to adjust note velocity?
-
12:20 What do the colors represent in the piano roll?
-
12:30 How do you make the velocities the same?
-
13:20 How do you create an empty MIDI region?
-
14:16 What’s the process for quantizing in Logic?
-
14:35 What is the function to make the notes longer in Logic?
-
15:40 How does he enter notes slower? What is the function called?
-
16:15 What is the process for using step input?
-
Practice using step input in Logic.
-
18:35 What is the purpose of the brush tool?
-
19:10 What is the purpose of turning the MIDI out off?
-
20:50 Practice adding an instrument not from the library.
-
24:00 Practice adding delay and other effects to your track.
-
25:00 Practice adding reverb.
Spring – P4: Choose Your Own Plug-in
For this project, you will learn about one of Logic’s plug-ins to mastery.
Here is how the project will work:
- You’ll create a 30 second clip of music. Loops are fine, but green software instruments are better.
- After the initial 30 seconds, you’ll repeat the same music, but this time, with your plug-in being used. You should use automation to change the parameters as the song is going on.
- You need to be able to explain what every parameter (knob, dial, etc.) does on the parameter. How do you learn? Google it, YouTube, etc. Search “Plug in Name Logic Pro X” and you’ll find many resources on these plug-ins.
- Your song needs to demonstrate 90%+ of the parameters for the plugin. These are all controllable through automation.
How is it graded:
- I’ll listen to your initial 30 seconds of music with no plug-ins.
- While your project is playing with the plug-ins, you’ll explain what each parameter changes. I want to hear the change in your 30 seconds of music too using Automation. As you talk, the parameters should automatically change.
- Your project isn’t done until you can explain all of the parameters to me! :)
Spring – P5: Daft Punk
This is the first remix project that we’ll do this semester. We’ll start by learning what are stem files?
We’ll do three remix projects in total:
- Daft Punk: simple, one track
- Another of my choice: several tracks
- You choose: most complex, many tracks
Two important files, the WAV stem and a sample MIDI file. Why are these important? They allow you to easily add software instruments. In the future, you will need to figure out melodies on your own using the MIDI keyboard. Also the written notation is there if that’s useful to you too!
- Order of operations
- You must, must, must use the metronome with this project! Ask if you need help.
- Change and Edit
- Add effects to alter the sound in different regions (automation)
- Chop it up and change the order of the original stem
- Things to Add
- Add a beat behind it (percussion, rhythm, etc.)
- Add a solo or other instruments
- Add bass, guitar, pads, etc., that fit the melody.
- Setting up your project
- Right click the WAV file above, save it to the desktop. Drag it into a new project.
- Change Project Sample Rate? Change Project.
- Right Click, Tempo, Apply Region Tempo to Project Tempo
- Check out the tempo track, you’ll see many small changes.
- Important: if you make changes to the order of the project, you’ll need to resync the tempo use the above process.
- Go to the region, inspector, enable Flex and Follow: On + Align Bars and Beats. If this is turned on, you can change the tempo using the tempo track and your project will follow.
Requirements:
For a 90…
- You must, must, must use the grid/metronome. If at any point you feel as if you’re not with the metronome, please ask me for help.
- Ten track minimum.
- Add an accompanying beat/percussion/rhythm. It should be varied (every four measures.)
- Add other accompanying instruments. Check out the pads and arpeggiators!
- EQ each track.
- Two additional plugins of your choosing.
For the final ten points:
- A track that is interesting to listen to, and elevates the original Daft Punk STEM.
Spring – P6: Superstition Remix
Getting Started
- Make a new Logic Project
- Download this zip file that includes needed STEMs.
- Save your Project “Superstition Remix”
Add Audio Files
- Select all AIFF audio files, and drag and drop into a new Logic Project
- Select “Create new Tracks” and “All selected files are stems from one project”
- Identify Song track versus Stems. The song track shouldn’t be on your final project, only the stems.
- Make a track stack by selecting the audio files (excluding the song), for better organization.
- Name your track stack “stems”
- Check Global track and be sure the tempo synced into the track
Add MIDI files
- Select No to importing tempo information.
- Make a track stack for your MIDI files.
- Change your drum track into a drum instrument.
What are the goals your remix? Something new and unique!
- New drum part? Yes!
- Tempo changes? Yes!
- New instruments? Yes!
- Remix with another song? Yes!
- Loops? Sure!
- Length requirement, one minute!
- The project, basically untouched and unchanged? Boo!
- Copy and paste between this song and another? Boo (but done inventively, sure!)
Requirements:
For a 90…
- You must, must, must use the grid/metronome. If at any point you feel as if you’re not with the metronome, please ask me for help.
- Remember: the primary goal should be it sounding like primarily Superstition, not just Superstition “sprinkled in”
- Question to ask yourself: would I know this is Superstition if I didn’t know the assign ment?
- Add an accompanying beat/percussion/rhythm. It should be varied (every four measures.)
- Add other accompanying instruments.
- Two additional plugins of your choosing.
-
Compressor and EQ on master track.
- For the final ten points:
- A track that is interesting to listen to, and elevates the originally provided STEM.
Spring – P7: Sea Creatures
- Select one of these three sea creatures videos to create a film score to.
- Use a combination of:
- Green MIDI Tracks
- Audio WAV files (pull in from YouTube using Loopback Audio)
- DSP (Plug-ins.) A compressor and EQ must be on your output track.
- To import the videos, simply drag and drop the video into Logic. That’s it!
For a 90:
- Metronome is required.
- Be sure that you are using at least one or more blue WAV files.
- There should be at least three green MIDI regions.
- Two additional plugins of your choosing.
- Compressor and EQ on master track.
For the final ten points: A track that fits the video well (a true soundtrack) and enhances the video.
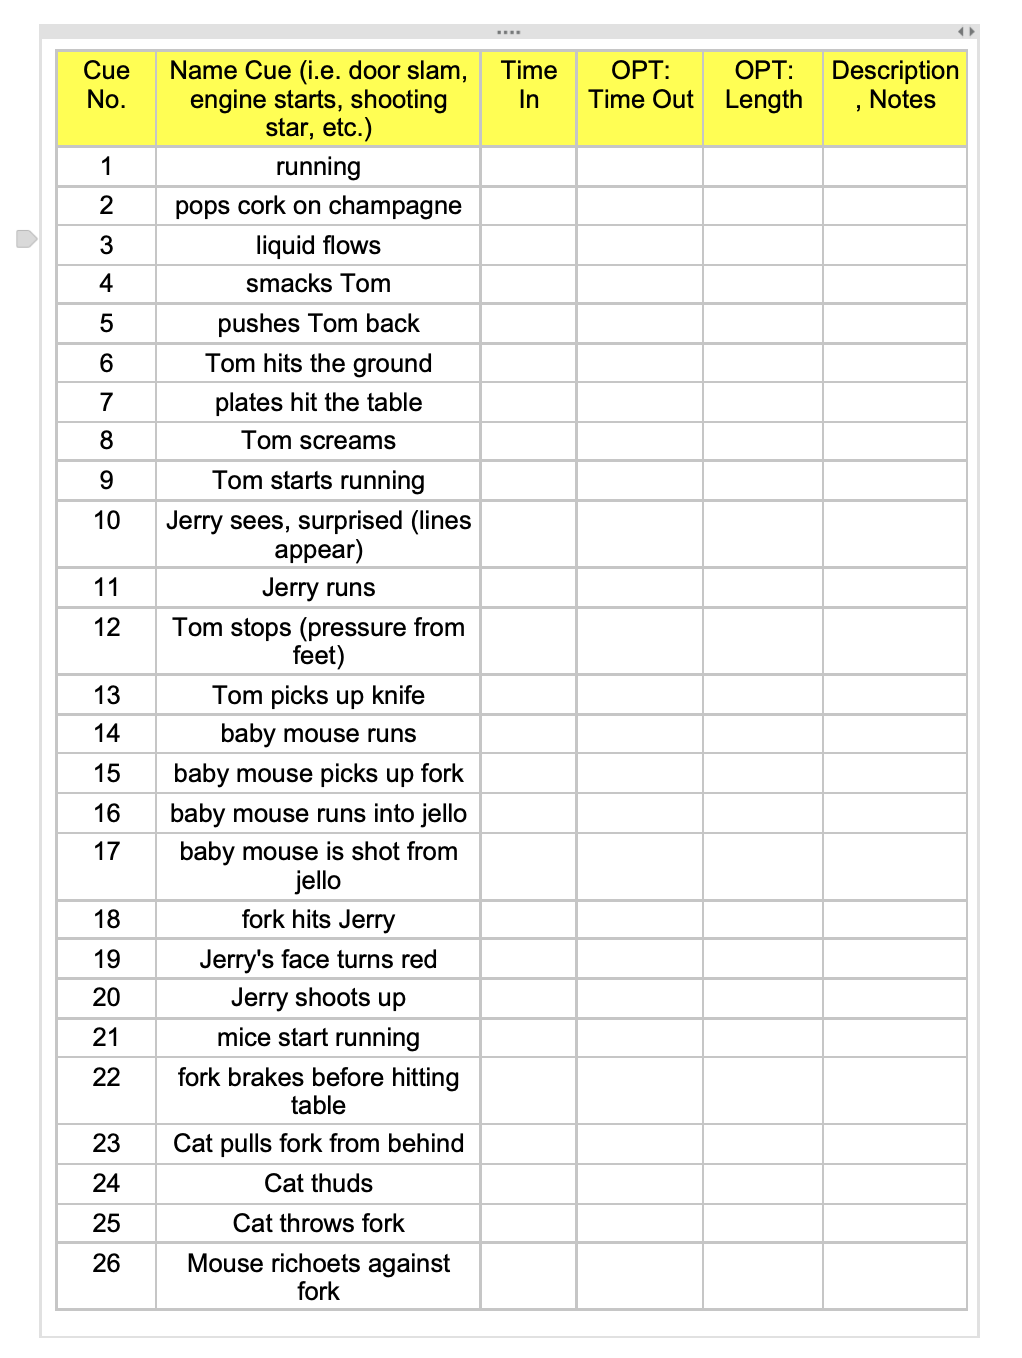
Spring – P8: Tom and Jerry
You’ll create a film score and sound effects for a brief Tom and Jerry cartoon.
Requirements:
For a 90…
- Cue Sheet is filled out (example is below)
- 26+ SFX are used
- Timing and coordination are accurate
- You have an effective musical score (layered loops and MIDI, no pre-recorded soundtracks)
- Compressor and EQ on the output track
For the final 10:
- Effective musical score and well timed sound effects
- Other DSP/effects/plugins add to the final product
Spring – P9: Final Cartoon Video
For your Final Project, you will do all the sounds, music, and dialogue for an animated clip from a movie/TV show of your choice: Finding Nemo, Frozen, Kim Possible, The Incredibles, or Phineas and Ferb.
Here is the order of completing this project:
- Start with the dialogue: write out the script in a Google Doc for the video. Who is saying what? You are more than welcome to utilize another person to record, but you need to create your own projects. The Incredibles Script is listed below.
- Record the dialogue in the Learning Commons.
- Create a Cue Sheet: three columns, what’s happening, Time In, Length/Time Out
- Find your sounds: Use SoundBible, BBC Sound Library, YouTube Sound Library, and Audioblocks
- Add your sounds into Logic: Don’t guess and check, use your Cue Sheet! I recommend recording sounds as well as using pre-recorded sounds (it’s easier than you think!)
- Create the soundtrack: Create the necessary music to evoke the mood you desire. It should last approximately 75% of the duration of the track. The music you create must be from original or loops, no pre-recorded music from YouTube.